
How to Lay Out a Cone or Truncated Cone Flat Pattern
The geometry of developing a cone, layout radius and arc angle formulas, mean diameters for thick plate, marking out, splitting into segments, and when triangulation is needed.
· 10 min read
A concentric cone, or a truncated cone (a frustum), is one of the few curved shapes a fabricator can make exactly from flat sheet. Cut the right annular sector, roll it, close the seam, and the result is a true cone with no stretching anywhere. Hoppers, reducers, stack transitions, cyclone bodies, funnels and lampshades are all made this way. This post derives the layout formulas from the cone’s geometry, works an example in full, deals with plate thickness and segmenting, and lists the practical steps for marking the pattern out. The Cone Flat Pattern Calculator does the arithmetic and draws the pattern to scale.
Why a cone unrolls exactly
Some surfaces can be flattened without distortion and some cannot. A sphere cannot, which is why world maps always stretch something. A cone can, because it is a ruled surface: every point lies on a straight line running from the apex to the base, and those lines stay straight and keep their length when the surface is unrolled. In the flat pattern each of those lines becomes a radius of a circle centred on the apex. The large edge of the cone becomes an arc, the small edge of a frustum becomes a smaller concentric arc, and the seam becomes the two straight radial edges.
That picture gives the whole method. The layout radii are distances along the cone’s side from the apex, and the arc angle is whatever makes the arc lengths equal the circumferences of the finished cone.
The layout formulas
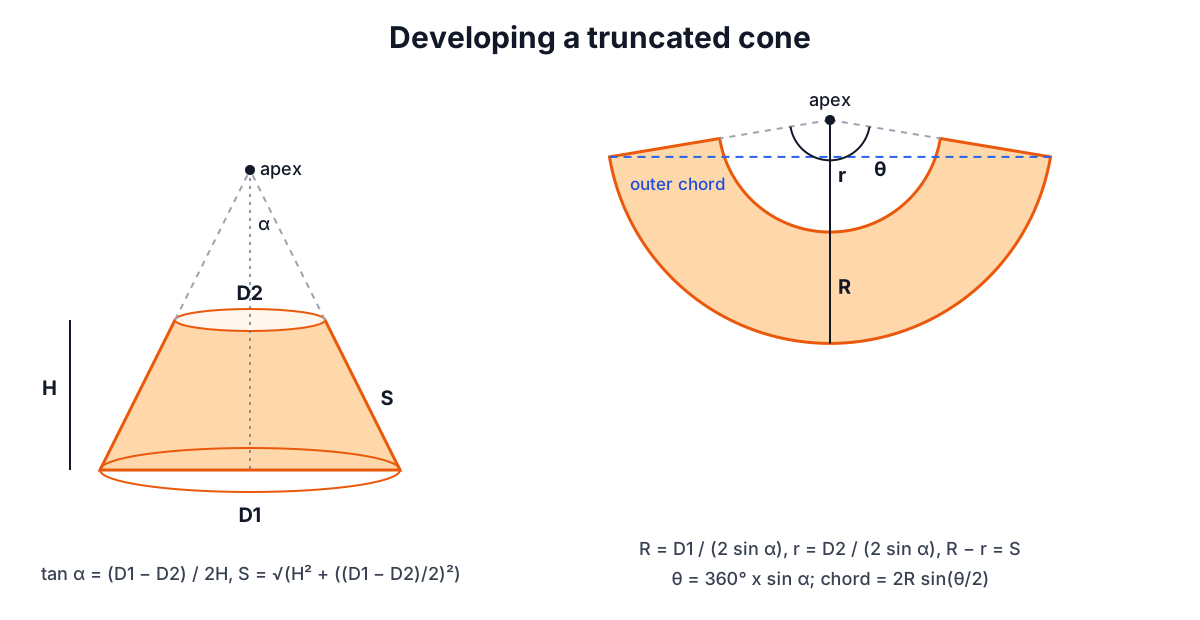
Let D1 be the large diameter, D2 the small diameter (zero for a pointed cone) and H the vertical height between them. The side of the cone makes a half apex angle α with the axis:
tan α = (D1 − D2) / (2 H)
slant S = √(H² + ((D1 − D2) / 2)²)
Extend the side up to the apex. The distance from the apex to the large edge, measured along the side, is the outer layout radius, and to the small edge the inner layout radius:
R = D1 / (2 sin α)
r = D2 / (2 sin α)
R − r = S
The arc angle θ of the pattern makes the outer arc equal to the large circumference: θ x R = π x D1 in radians. Since D1 / (2R) = sin α:
θ = 360° x sin α = 180° x (D1 − D2) / S
A tall, slender cone has a small α and a narrow pattern. A flat cone has a large α and a pattern that approaches a full ring; at α = 30° the pattern is exactly half a circle, and above that it is more than half.
A worked example
A hopper transition with mean diameters of 1,000 mm and 500 mm and a height of 500 mm:
(D1 − D2) / 2 = 250 mm
tan α = 250 / 500      →  α = 26.565°
S = √(500² + 250²)     = 559.02 mm
sin α = 0.44721
R = 1000 / (2 x 0.44721) = 1,118.03 mm
r = 500 / (2 x 0.44721)  =   559.02 mm
θ = 360 x 0.44721         =   161.00°
outer chord = 2 R sin(θ/2) = 2,205.4 mm
The blank needs a sheet roughly 2,205 x 1,026 mm. Check the arithmetic two ways: R − r = 559.02 mm equals the slant length, and the outer arc 1,118.03 x 161.00 x π/180 = 3,141.6 mm equals π x 1,000. Those two checks catch almost every transcription error.
A quick sanity check for pointed cones is the 3-4-5 triangle. A cone 600 mm across and 400 mm high has a base radius of 300, so the slant is 500, sin α = 0.6 and the pattern is a 216° sector of a 500 mm circle. Because 216° is more than 180°, the chord between the arc ends is no longer the widest dimension of the blank, and the pattern has to be laid out by angle.
Plate thickness and mean diameters
For thin sheet you can ignore thickness. For plate it matters, because the material stretches on the outside and compresses on the inside as it rolls, and only the middle keeps its length. Lay the pattern out on the mean surface.
Drawings usually give inside or outside diameters. The correction is not simply ± t, because the wall is inclined. Offsetting a sloping wall by half its thickness, measured square to the wall, moves its intersection with a horizontal plane by (t/2) / cos α. Across the diameter that is:
D mean = D outside − t / cos α = D inside + t / cos α
For the example above in 6 mm plate dimensioned on the outside, cos α = 0.8944 and the diameters drop by 6.71 mm, to 993.29 and 493.29 mm. The outer layout radius falls from 1,118.03 to 1,110.53 mm, and the large circumference by 21 mm. Laying out on the outside dimensions instead would make the blank 21 mm too long around and the finished cone about 6.7 mm oversize.
Splitting a cone into segments
Large cones rarely fit on one sheet, and a 3 m blank may not fit through the rolls in one piece. Dividing the pattern into N equal segments solves both:
- Each segment has an arc angle of θ / N.
- Its outer chord is 2 R sin(θ / 2N) and its inner chord 2 r sin(θ / 2N).
- Each segment is a smaller annular sector that nests far better on a sheet.
The example in 6 mm plate split into three gives segments of 53.67°, each with an outer chord of 1,002.6 mm and an inner chord of 497.9 mm, fitting inside about 1,003 x 618 mm. Equal segments mean one template, one roll setting and interchangeable pieces. Remember to add the weld gap or seam allowance to each segment; the calculator’s figures are net.
Marking out on the floor or the sheet
- Find the apex. Mark a point on the sheet, or on a scrap tab clamped beside it when R is longer than the sheet allows.
- Swing the arcs. With a trammel, beam compass or a fixed-length string, scribe the outer arc at R and the inner arc at r.
- Step off the angle or the chord. For patterns under 180° measure the chord between arc ends. For larger angles, divide the arc: step off a smaller chord several times, or use the arc length π x D1 with a flexible rule.
- Draw the radial edges. Join each arc end back to the apex. Check that the two radial edges are equal to S between the arcs.
- Add allowances. Seam gap, bevel and trim at the large and small ends as your weld procedure requires.
For CNC cutting, the calculator’s numbers go straight into the CAD sketch: two concentric arcs, two lines, one angle.
When this method does not apply
The formulas cover right circular cones only, where the two circles are parallel and on the same axis. They do not cover:
- Eccentric or offset cones, where the small end is not centred over the large one. These are developed by triangulation, dividing the surface into thin triangles and laying them out one by one.
- Oblique ends, such as a cone cut by a sloping plane to meet a pipe at an angle. These need true-length lines for each generator.
- Square-to-round transitions, which combine flat triangles and partial cones and are always triangulated.
For any of those, a CAD sheet metal module or a triangulation layout is the right tool. For the concentric case, the closed-form layout is exact and quicker than any software.
Related calculations
The pattern area from the calculator, multiplied by the weight per area, gives the blank weight; the sheet metal weight calculator provides kg/m² for each material. For the capacity of a cone-bottom tank or hopper, use the tank volume calculator, which includes a dip chart. For flanged collars and brackets around the cone, see the bend allowance guide, and for sizing the seam weld, the fillet weld guide.